Journeys and campaigns: Tracking lead origins
Leadpro supports the capability to track the journey an individual took before arriving at the source tool that generated a lead from them, using Google Analytics UTM attributes. This data can be seen in the dashboard through the 'Journey' and 'Campaign' columns. See further below for what lead generation tools support generating Journeys and Campaigns.
How The Journey column works
The journey column uses 'journey names' to tag onto leads to indicate they have one or more UTM attributes (or other details) that matches to that journey's criteria. This can be useful for example, tracking a particular utm campaign, source, and medium in one journey, and filtering on which leads are decorated with all three expected values progressed through that journey.
Journey names and filter criteria have to be set up in order for this column to produce any results. See further below on details of how to achieve that.
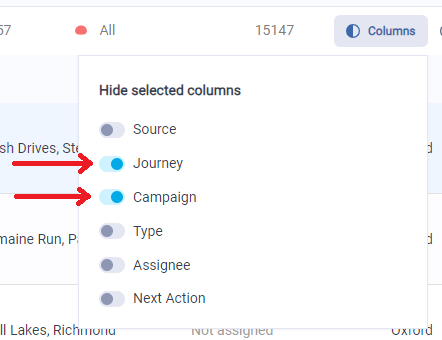
To find the Journey column, use the 'columns' button at the top right of the dashboard to deselect the column from hiding.
Building new journeys and their filter criteria
Journeys configuration is accessed through the 'Account' menu item, the on the 'Journeys and Filters' tab in your account settings. Here you will see your Leadpro account filters, and Journey names on two separate lists.
Journeys list This is where your journey names and associated filters can be created and maintained. Creating a new journey will give you a chance to set the journey name, which is the display name that will associate with new leads and allow you to filter your dashboard results with. Creating a new journey will also give you the ability to associate a filter. This means you first need to create a filter and it's conditions to associate with a journey.
Filters This is where your account filters can be created and maintained. These filters are used through multiple mechanisms in your Leadpro system, including journeys. Creating a new filter gives you the ability to name and set its filter conditions, which use a number of lead data points, including UTM attributes.
An example journey
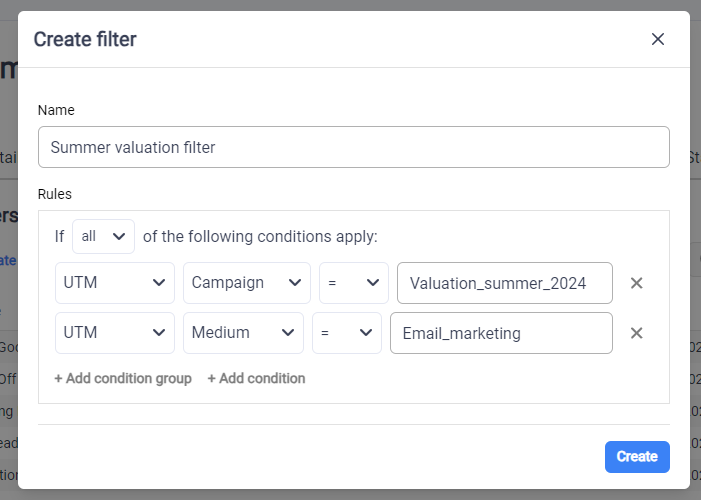
To demonstrate an example: We may have an email marketing campaign running which encourages our users to perform a valuation with us, and we'd like to filter the leads in our dashboard by individuals that have come through this email marketing > IVT tool > Leadpro journey. When preparing this email campaign, we our IVT link in the marketing email to have:
A utm_campaign equaling "valuation_summer_2024"
A utm_medium equaling "email_marketing"
So let's build our journey: First we create a Filter with an example name of "Summer valuation filter" and set the conditions to match the above utm attributes we're expecting to see on our leads.
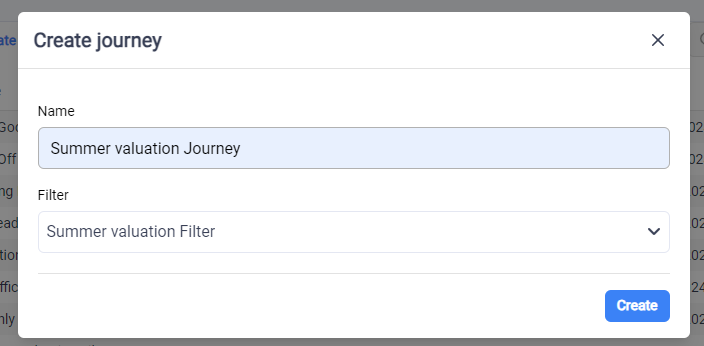
Next we need to define a journey name and associate it with that filter. So we create an example journey with the name "Summer valuation 2024 journey" and associate our new filter with it.
Now if we return to our leads dashboard, we can use the column filter on the journeys column to select our new journey and filter our leads to only show leads that match that journey's criteria:
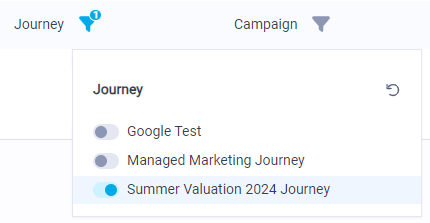
Now we can see our lead results that match our joruney filter:

Multiple journeys can be matched against a single lead. In the event you have many journeys against one lead, the column on the dashboard will truncate the journey names and instead provide you a number of associated journeys to that lead. To see those journeys, click on the lead and scroll down the the 'Journeys' section fo the lead details panel.
How the Campaign column works
The campaign column simply uses the value provided from the 'utm_campaign' attribute, through the IVT, Lead Forms, or API features. This can then be filtered against using the column filter button.
To find the Campaign column, use the 'columns' button at the top right of the dashboard to deselect the column from hiding.
Supplying UTM attributes into Leadpro via the IVT
To supply UTM attributes into your Leadpro leads through the Instant Valuation Tool, simply append the attributes onto the end of your IVT link. For example, if your IVT link is www.example.lead.pro, then you can add on the UTM attributes like so: www.example.lead.pro?utm_source=<source value>&utm_medium=<medium_value>&utm_campaign=<campaign value>
Supplying UTM attributes into Leadpro via Lead Forms
To supply UTM attributes into your Leadpro leads through the Lead Forms tool, simply append the attributes onto the end of your Lead Forms link. For example, if your Lead Forms link is www.example.lead.pro, then you can add on the UTM attributes like so: www.example.lead.pro?utm_source=<source value>&utm_medium=<medium_value>&utm_campaign=<campaign value>
Supplying UTM attributes into Leadpro via the inbound lead API
Three new fields are available on the inbound lead API payload to pass in UTM attributes. These are 'utm_source', 'utm_medium', 'utm_campaign'. More information about these can be seen on the API guide: Inbound Lead API Guide